 Introduction to Linux |
| Introduction to Linux |
Timesharing systems like Linux are designed to allow multiple users to contemporaneously invoke multiple processes using the same hardware. In the early days of timesharing, files, processes, and users simply coexisted without any protection, but as a result, systems were very unreliable, and users often lost all of their information due to an error in another user's program. Eventually, operating systems were changed so as to protect users, processes, and files from each other, so that each relates to a virtual computer that is independent of other factors in the environment to a large degree.
In the White Glove system as it boots from CD-ROM, the only user is 'root' (sometimes called superuser). The superuser has unlimited privileges. For example, when logged in as 'root', you can delete all of the files on most installed systems, including the files that make the computer work. Similarly, you can change information of any other user, enable or disable networking, and cause the computer to shut down. Normal users cannot do this. To show this more clearly, we will now add a user and try doing things as that user and as root.
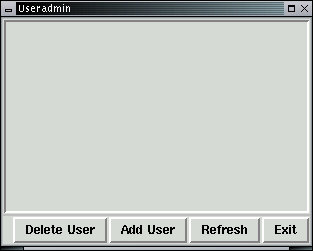
To add a user in White Glove, select User Control from the Administrator X11 menu:
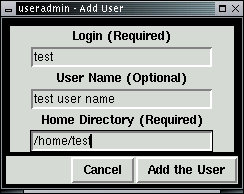
Select Add User and the following menu will appear. We have filled in a sample user name 'test' with the home directory in /home/test. The home directory is the location the user is normally put when they first login to the computer. For example, when you logged in as root, you were put in the /root directory. The login identity is what you type at the login prompt, while the user name is the name of the individual who is supposed to use this user identity.
After pressing Add the user the following result is displayed in the useradmin window:
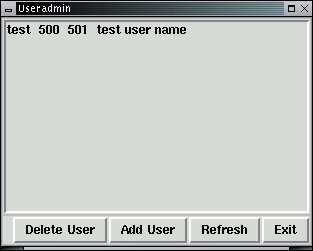
The user can be removed by marking the line containing the user information and pressing the Delete User button. But for now, leave this user on the computer and add another user called 'someone' so we can explore how this works.
Once a user is added, a password should be provided in order to protect the account from other users logging into it. This is done by using the 'passwd' command from an xterm window. Move the cursor over an xterm window and type:
wg:root /root> passwd test
Similarly, change the password for the user 'someone':
wg:root /root> passwd someone
| Linux differentiates upper and lower case in commands and arguments. Make sure you use upper case and lower case appropriately. |
These operations set the password for the identified user according to standard password policies for the computer. You can set the password for any user while logged in as that user by typing 'passwd', but only root can change other users' passwords. When a password is entered, it sets the password field in the file called '/etc/passwd'. The password is asked of the user when they login to the computer. A wrong password means they cannot login. The example below uses the 'cat' program to type the '/etc/passwd' file on the screen.
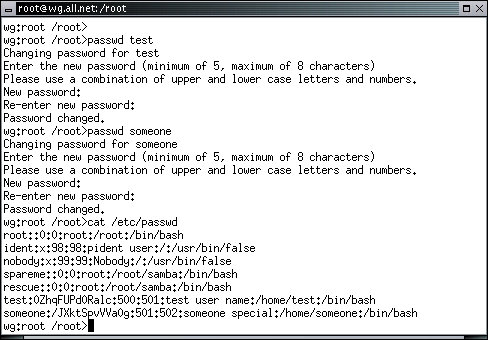
This password file has several features. The first thing you might notice is that it lists several users, one per line. The password area is between the first and second colon on each line. Notice that the user 'root' has an empty entry - which means that there is no password required for the user 'root'. This is a very insecure configuration for networking and when the computer is not physically controlled, but for now we will leave it be. There are also other user IDs that you did not enter earlier. They will be discussed later, along with other aspects of this critical file.
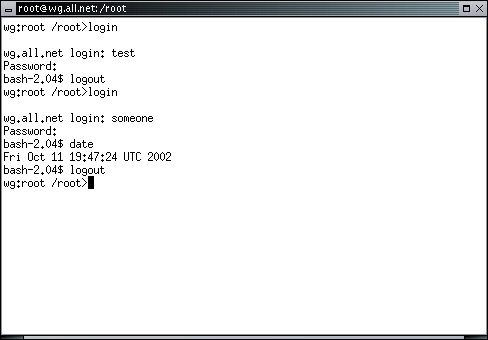
In order to test whether a user account works, you should try to login to it. The simplest way to do that from X11 is to open an xterm window, move the mouse over it, and type:
wg:root /root> login
This will run the program called 'login' which allows another user to login to the xterm window. The rest of the programs and windows will still be logged in as they were before, but you can use this to try to login as 'test' and 'someone'. When you try to login, you will be prompted for a password (unless you didn't assign one when you created the user). The password is not 'echo'ed to the screen when you type it. When you login successfully, you will be prompted with a different prompt than the one root gets. This prompt contains 'bash-2.04' with 'bash' being the name of the command interpreter (also called a shell) and a '$' sign which indicates that it is ready to accept commands. To logout and return to the previous session, hold down the [CTRL] key and press 'd' at the same time. This is normally written [CTRL-D]. Here's what the results of logging in as 'test' then as 'someone' looks like:
Users are identified by user identifications (Uids), each of which is associated with an integer in the range of 0 to a system specified maximum. We will use Uids and the integers associated with them interchangeably whenever that doesn't cause confusion. users with Uid=0 are given superuser privileges, which allows them to act as any other user on the system. Users with Uids less than 100 are, by convention, system users, while higher Uid numbers are usually reserved for normal users. By default, Linux systems create new user and group IDs starting at ID number 500 and counting up from there.
| When user IDs are created, they are usually provided with a home directory without any files in them, or with an initial file called '.bashrc'. This file is run as a bash command script whenever the user logs in. The reason the users in these examples have a different prompt from the root user is that the root user is given a .bashrc file that initialized prompts and other similar things. Also note that filenames starting with '.' are not printed with 'ls' unless you add the '-a' option. |
users are placed in groups, identified by group identities (Gids). Each Gid is associated with an integer in the range from 0 to a system specified maximum. Groups with Gid=0 are reserved for system groups. In most installations, other groups with Gid less than 100 are used for system functions, while groups with Gid over 100 are used for normal groups of users.
In order to be recognized by the system as being a given user, it is necessary to either login to the system by identifying your Uid, or change from your current Uid to another Uid. In order to prevent mistaken or malicious acts toward users, Linux provides an authentication mechanism whereby users must authenticate their identity by providing a password to the system. Linux transforms all passwords into an encrypted form in order to prevent attackers from exploiting copies used for comparison purposes. Once a user is properly identified and authenticated, Linux grants the user access to all authorized information. More details of the authorization mechanism is described in a later section of this course.
Each user is associated with one or more groups. When a user is identified to the system, a default Gid is provided and the system grants access to all authorized information for that group. A user can change groups by making an operating system request. Linux then checks its files to determine whether or not the user is an authorized member of that group, and grants all authorized access. Group membership is specified in the '/etc/group' file which can be seen by typing:
Other information on users and groups is stored in other files contained in the '/etc' directory. We will get into more detail later, but for now, let's move on to the things users can do and how they are protected from each other.
The login program allows users to specify a Uid and password, and if they match, initializes the user by setting the Uid and Gid, placing the user in a system specified directory, and running a user specific program. This was shown in the example above.
The su program allows users to change Uids by specifying a new Uid and password. If they match, the system changes the effective Uid, and creates a new process by running the user specific program that would be run at login for the new user. White Glove does not permit 'su' to operate because of its potential for abuse. If you want to login as a user, you have to login as you did in the examples above.
The newgrp program allows users to change from their current user group to other user groups if they are members of those groups. If the user is a member of the specified group, the call changes the effective Gid, otherwise it fails. White Glove does not permit 'newgrp' to operate because of its potential for abuse. Users are identified with one and only one group, and different user IDs are required for each group.
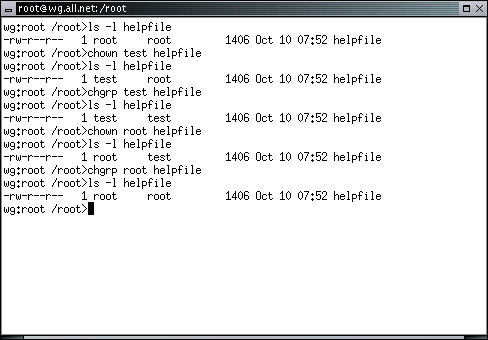
The chown program changes the owner of a specified file. This call only works if the effective Uid is that of the superuser. In other words, if you are not logged in as root, you cannot change the owner of a file. If you create a file it will be owned by you and you cannot give away ownership. However, as root, you can change the ownership of a file. For example, from an xterm window, type:
wg:root /root> chown test helpfile
wg:root /root> ls -l helpfile
wg:root /root> chown root helpfile
wg:root /root> ls -l helpfile
Notice that the third column changes when you change the ownership of the file.
The chgrp program changes the group of a specified file. This call only works if the effective Uid is that of the superuser. As in ownership, when you create a file it is assigned your current group ID.
wg:root /root> chgrp test helpfile
wg:root /root> ls -l helpfile
wg:root /root> chgrp root helpfile
wg:root /root> ls -l helpfile
In the example below, notice that the file has a size (1406 bytes), a creation date and time (October 10 at at 07:52), and some other parameters we will discuss later.
The who program lists the users currently logged into the system and there are some other related programs of general interest. The interesting thing about users in Linux is that they are protected from each other using access controls. In order to really appreciate this, we need to move on to files and directories in more depth.
We have described briefly how users and groups are created, how they interact, how to set passwords, and the protections provided for users and groups.