 Introduction to Linux |
| Introduction to Linux |
Files come in four types (Regular, Character-Special, Block-Special, and Directory). They are used to store information and as an abstraction to interface with peripheral devices. The file types are used as follows:
Regular files are the normal sorts of storage files we tend to think of when we think about computers. They are accessible either sequentially or randomly; they can be created, destroyed, and changed; they store what you put in them and retrieve it at your request. The file listed in the previous example is a regular file called helpfile and it is used to store helpful information. In the long directory listing given by the 'ls -l' command, this is indicated by the leading '-' in the output line.
Character-Special files are logical units used to represent sequential device control programs. They are sequential in that you send them sequences of symbols that are processed into output as they arrive, and they return sequences of symbols arriving from their inputs. They are device control programs in that, even though you treat them as files from an input and output standpoint, they actually act as programs that transform input and output requests into actions. They are character files in that they handle information a character at a time. A good example is the file called '/dev/tty' which is the user's 'terminal'. It listens to inputs from the keyboard and sends output to the screen. To see the listing, type:
In the resulting listing notice that instead of the file size, two integers separated by a comma appear. These are called the major and minor device numbers and they link the filename to the software inside the Linux operating system that handles input and output for the device.
Block-Special files are like character special files except that they handle information in blocks of bytes instead of single bytes. This makes them particularly suitable for Direct Memory Access (DMA) devices such as disks. For and example, type:
| To find out what file is being executed when you type a command, use which. For example, 'which ll` will tell you that the 'll' command runs the program stored in the file '/usr/local/bin/ll'. In the case of the ll command, the file is just a bash script. Type it out with: cat /usr/local/bin/ll |
In this case you will see that a 'b' is the first character on the line, indicating a block special device. Notice that the major and minor device numbers are different from those of the /dev/tty listing. Also note that the command this time was 'll' instead of 'ls -l'. The ll command is an abbreviation for ls -l that is available on most Unix-like systems.
Directory files are actually just like regular files except that they store lists of file names and their information node (inode) numbers. An inode number is an integer associated with a system structure that holds system information about a file, and is designated by the system upon file creation. For example, type:
In this case, you are listing the directory called '.', which always corresponds to the directory you are currently working in, called the 'working directory'. Notice also the 'd' at the start of the line. The '-d' in the command line indicates that the directory itself should be listed rather than all of the files in the directory. To get the listing of directory contents, use:
In this case you get the listing of all the files in the directory. There is no need to add the '.' to name the current working directory in this case, but if you wanted to list another directory, you would name it.
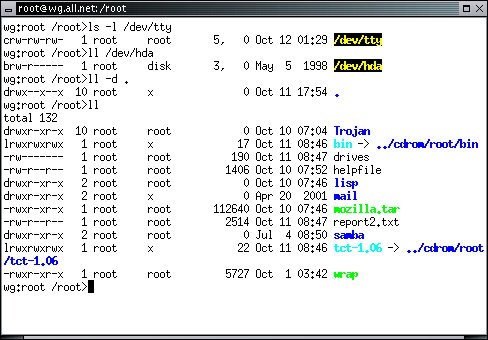
This listing of the whole directory reveals some other information that is worth knowing about. Some lines start with an 'l'. This indicates a 'link' to another file. In this case, the name in this directory (bin) really refers to a different place in the file system - '../cdrom/root/bin'. Whenever you use the name 'bin' in the context of this directory, it really refers to that other place in the file system. Notice also that the filenames in this listing are colored. The color scheme is used in many Linux systems to indicate the type of file. Regular files that are not able to be run as programs are in black, for example, and other colors stand for other things.
A few examples may help to understand how these types of files are used. Memory, for example, is modeled by several Character-Special files which allow user memory, kernel memory, or physical memory to be accessed. Physical disks are represented by Block-Special files , while the files stored on those physical disks are represented by Regular files, and grouped under Directory files. Most sequential peripherals, like terminals, tape drives, and parallel ports, are represented as Character-Special files. DMA devices like network interfaces and external disks, are typically represented as Block-Special files, if they are represented in the file system.
The Directory files are normally used to form a tree structured logical file-structure, with the ``/'' (root) directory as the root of the file tree. Under the root you might see other directories or files, and under each directory there might be more directories or files. There are tools to allow various things to be done with files and to look through the file tree, store file trees as single files, and so forth. There are also a variety of conventions used in Unix-like systems for where certain things are stored.
A handy program that runs in X11 under White Glove is used to display system status information including information about files. To run it, select System Status from the Administrator menu. For the example shown below, select File from the System Status window:
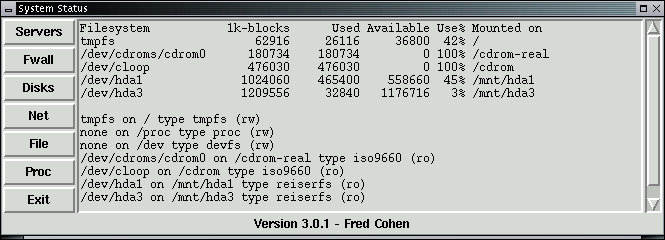
This listing shows that on this particular computer, several file systems are identified and available for access. The file systems '/dev/hda1' and '/dev/hda3' are on the hard disk of the computer that this White Glove CD was booted from. The listing shows how much space they have and how much is used, and it indicates that these file systems are mounted under '/tmp/hda1' and /tmp/hda3' respectively. It also shows that they are mounted read-only (ro) so that they cannot be modified except by special commands and then only by the user 'root'. This is a standard function of White Glove because it boots from a CD. It finds whatever file systems it can and makes them available for read-only access to the user. To get the same output in an xterm on most Linux systems, you would type:
The df program lists the amount of space used, space available, and total space available on each mounted file-structure. The mount program, in this case, is used to list all mounted file structures.
We have seen already that the ls program lists file names and details. But this program can do this in a lot of different ways - too many to explain in a course like this - but not too many to explain on the White Glove CD and on most Unix and Linux systems on the market. The online help for most Linux systems is provided by the 'man' command. As a good example, do this:
This command shows you the manual entry for the 'ls' program. Essentially every program on Linux has a man entry that displays help. On the White Glove CD, manual entries can also be accessed by using the web browser. When the browser starts up, select User-Manual from the menu area on the web page and press the word 'here' shown highlighted within the resulting page. This will give a listing of White Glove manual entries.:
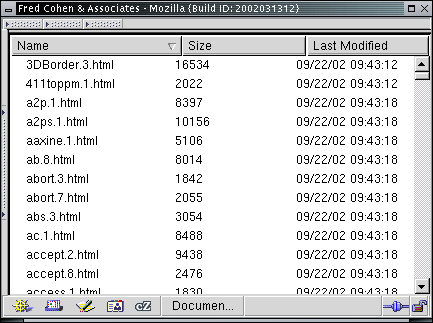
From here you can select any entry you are interested in by clicking on that filename. In the display above and the one below, we have removed the buttons from the top of the window so you can see more of the information of interest. Use the back button on the browser to go back and select another entry. Here's an example of the 'ls' manual entry from the browser:
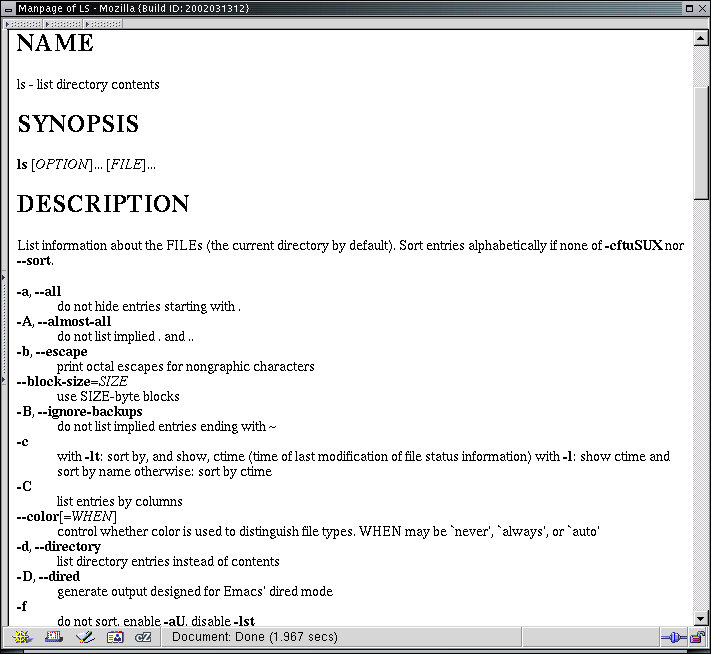
As you can see, there are a lot of different options, but most of them are used only for systems administration and automated analysis tasks so they don't often impact normal users. One of the most important aspects of using Unix and Linux commands is learning how to use the manuals and when. As you grow used to the commands you will need the manuals less because you are trying to find out what things do and more for finding out how to do some special function you remember a program has but haven't used in a while.
In this next example, we show a variety of commands to show how files, directories, protection and some commands with files work. Two different users are logged into the two different windows and they type almost identical command sequences.
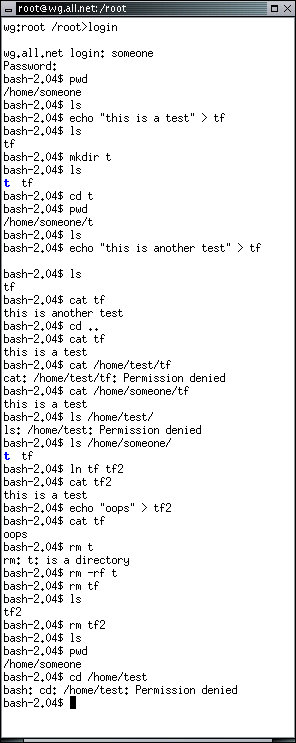
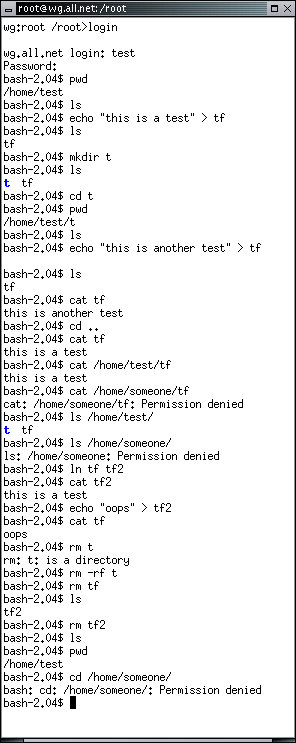
The pwd command prints the working directory. As you can see, each user is logged into their own directory to start. The command echo "this is a test" > tf is used to place the quoted text into the file tf. The mkdir command is used to make a directory of the specified name within the current working directory. The ls command then shows the directory in blue and the regular file in black. The cd command changes the working directory. Several 'permission denied' examples are given when one user tries to access another user's files. This is because, by default, users are configured so that they cannot examine or modify other users' files. Later on, the ln command links two regular files together, which means that there are two names for the same file. As you see, when one file is changed the change is reflected under both names. The rm command removes a file. With the '-r' option it removes directories and everything under them, and if you add 'f' it will try to remove files regardless of protection settings by making them deletable if it can. Finally, we try to change into the other user's home directory, and it fails.
We will go further into protection in Linux in a later part of this course, but for now, it is time to move on to some of the other file commands.
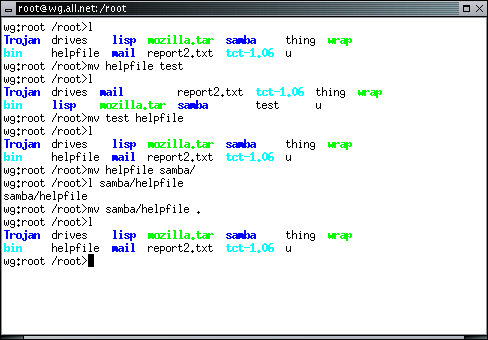
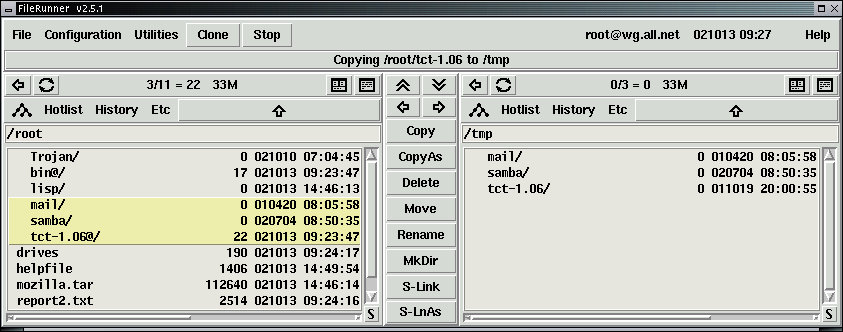
The 'mv' command is used to move a file from one place to another. If you move a file within the same disk partition (an area of a disk used for storing one file system), then mv simply renames the file without any copying. This is very fast. If you move a file across file systems, it is necessary to copy the file and then delete the source copy, and mv will do this for you. Try this from an xterm window logged in as root in the root directory:
Notice that the second ls differs from the first in that the file 'helpfile' is gone and the file 'test' appears. Now move test back to helpfile. Next, move helpfile into the directory samba by typing:
Notice that when the last file is a directory, you don't have to name the resulting filename, the original filename is retained. If you want to move many files, or even mixes of files and whole directory structures into a destination directory, all you have to do is use mv and list the files to be moved with the destination directory as the last argument to mv. Move the helpfile back.
If you want to copy a file without deleting the original copy, the cp command is what you are looking for. The syntax is just like the mv command, but the result is a copy of the file into the destination with the original left in place. Try this:
The rm command in this case is used to remove the extra copy of helpfile from the samba directory. You would not want to use it if you wanted to keep the copy on the disk.
| Because White Glove runs from a CD-ROM instead of a hard disk, some of the files cannot be deleted, even by root. For example, try: |
There are many other file-related commands, but we are only going to cover two of them here. They are tar and gzip, and they are important because they are commonly used to store large numbers of files into a single file.
The tar program converts a list of files into a single binary file suitable for placing on a tape, or unpacks the binary file into the constituent files. The tar command also stores information about the file, its owner, its group, and its protection bits. Provided tar has sufficient privileges, it can restore these values when restoring files. Try this example from the /root directory:
In this case, we have created a single file called bin.tar from all of the files in the /root/bin directory. The new file is slightly larger than the combined sizes of the files that it is built from because it has to store information about the file protection settings and names and that information is not contained within the files themselves.
Note that the tar file in this case is stored in the root directory of the file system because it starts with a '/'. Any file in Linux can be accessed by providing a complete path from the root directory, and any time we start a filename with a '/' we are providing a complete and unambiguous path to that file.
To extract the data back out of the tar file, we will do this:
| In the bash command interpreter that runs in your xterm window, you can type several commands on one line by separating them with ';'. For example that whole last sequence could by typed on one line as: |
In this case, we started in the /root directory - the home directory for the root user on most Linux systems, by typing the command cd with no parameters. Whenever a user types cd in this way, it returns them to the directory they start in when they login to the system. From there, we made the directory 'tmp'. This is a temporary directory made for this example. Because it has no '/' at the start, it is made in the current working directory, and the result is a directory that could also be identified by its full pathname '/root/tmp'. We then cd into that directory so it becomes out new working directory. Finally, we extract the tar files from the '/bin.tar' file into the current working directory. From here we can list the files and use them as we will. Finally, when we are done, we should clean up after ourselves by deleting all of these files and directories.

The gzip program is used to compress files. It does this by looking for new ways to encode the information that takes fewer bits than the original. For example, if we have a file that consists of 100,000 'A's in a row, we might encode the file with a special 'run length' code consisting of the integer 100000 followed by the string that repeats, enclosed in quotes - like this: 100000"A". The gzip program uses a variety of coding methods to try to compress files and it is commonly used in Internet-based distributions of programs. Here is a simple example you can try:
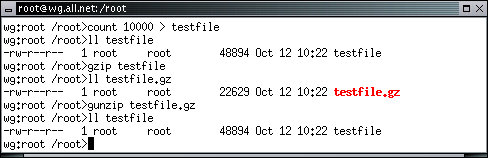
The gunzip program is a symbolic link to the gzip file. When gzip runs, it figures out which name it was called under and decides to unzip the previously zipped file. Note that the ll program shows zipped files in red. Note also that the zipped file is about half as big as the original file. The program count is only on White Glove, and all it does is count from one number to another number incrementing by a third number. If only one number is present, it counts from 1 to that number. If two numbers are present, it counts from the first to the second. You can test this example of count by eliminating the '> testfile' from the above command line. Note that it will print a lot of numbers on the screen.
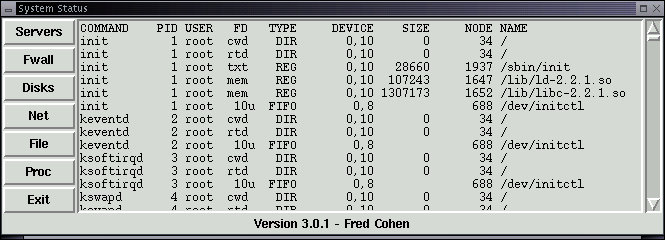
In Linux systems, there are many programs running at one time. We will get into more details on this later, however, at any given time, each of the running programs (called processes) may have any number of files opened. The following listing of open files is generated by using the File option from within the System Status selection of the Administrator X11 menu. IT shows the name of the command run, a lot of other information to be detailed later, and the name of the file it uses. Note that many programs are running and that most of them use other files from the computer. Each file with a pathname starting with a '/' relates to a specific file in the system. As an exercise, it might be useful to use 'll' to list the details of each file used by each program in order to understand how programs depend on other programs, library files, and other sorts of things.
By convention, system files under Linux are stored under specific names in specific places in the file-structure. There are a lot of files and directories used for Linux system files , and we will only describe those which are most important to systems administration and protection. Some filenames depend on the specific Linux/Unix version you are using, but most of them are uniform across all implementations.
The root directory normally contains the following:
The `/etc' directory is used to store highly volatile state information including the list of users, groups, passwords, terminal connections, operating system parameters, system startup sequences, the message of the day, and other such things.
The `/bin' directory is used to store system critical executable programs, including most of the tools described in this manual.
The `/lib' directory is used to store system libraries.
The `/dev' directory is used to store the block-special and character-special files that represent most of the peripheral devices and other physical system resources.
The `/home' directory is usually used to store the `home' directories associated with each user's storage area. It is also used to store other non-system files.
The `/tmp' directory is a temporary area used for storing intermediate results.
The `lost+found' directory in some file-structures is used to store lists of disk areas which are not usable for storage. This is normally because of hardware failures, but can occasionally be caused by software failures.
The `/usr' and `/etc' directories are particularly important to the systems administrator because they contain many of the critical configuration and user files. We begin with the files in /etc:
`/etc/passwd' contains a list of the Uids of all authorized users. It lists the Uid, the encrypted password associated with that Uid, the integer associated with the Uid, the default group for that Uid upon login, the name of the user, the directory the user is placed in upon login, and the program run upon login by that user.
`/etc/group' contains a list of Gids, the integer associated with them, and the Uids comprising each group.
`/etc/fstab' stores a list of the file-systems and how they are to mounted. This automates one of the many startup functions that would otherwise have to be done manually by the systems administrator at startup.
`/etc/inittab' specifies how the computer starts up. Machine states usually include a power fail state, a power-up self-test state, a microcode state, a single-user state, and a multi-user state. Some machines also have other states determined by the system designers. Inittab is normally used to turn devices on or off, specify how they are handled by `/etc/gettydefs', and initialize the terminal before login. Inittab can also be used to run a non-standard program on a terminal. For example, it could be used to automatically implement a systems administration capability, a printer controller, a batch processing mechanism, or a limited function menu system.
| The less program is very handy for viewing large files a page at a time. Press the [SPACE] key to go to the next page, and use the arrow keys to move up and gown the file. The [PAGE-UP] and [PAGE-DOWN] keys move a page at a time, you can quit by typing 'q', and you can search for the next occurrence of a string by using '/' followed by the string and using [ENTER] to end the search string. |
`/etc/motd' contains a ``message of the day'' that is printed on each terminal at login. This allows the administrator to put up notices for all system users.
`/etc/profile' contains a bash script that is run at login before granting the user process control over the terminal.
`/etc/stdprofile' contains a standard login profile copied into each user's directory when they are first added as users.
`/etc/termcap' contains a list of the different types of terminals and how they are interfaced with by terminal control programs. This allows thousands of different types of terminals to be handled uniformly by all Unix and Linux programs.
The directories in `/usr' are less critical to system operation:
The `/usr/bin' directory stores commonly used binary executable programs not required for systems operation.
The `/usr/local' directory is used to store local versions of programs, and typically has 'bin', 'src', 'lib', and 'include' directories.
The `/usr/include' directory contains header files included by user programs. These files store configuration or system dependent structures.
The `/usr/lib' directory stores library files with commonly used subroutines.
The `/usr/tmp' directory is used for temporary storage of non-system temporary files.
Under Linux, there is a particularly important directory called '/var'. This directory stores system log files, files associated with mail and news, and other related files. A good example is the file '/var/log/messages':
This file provides messages about important events on the system. For example, when you add users, it is logged here, as is information related to system startup, mounting and unmounting file systems, and other similar system information.
Disks are only so big. When they run out of space, you cannot store anything more without deleting something that is already stored or getting more storage. You should periodically use the df command to check and see if space is running out.
On White Glove, when it is booted from a CD-ROM, the main disk space it uses is actually RAM disk. That is, it is not really stored on a disk at all, but rather, it runs from the computer's random access memory. In this way it doesn't alter anything on the hard disk of your computer, but at the same time, depending on how much RAM you have in your computer, you can run it out of space pretty quickly. In this example, we are going to run the computer out of disk space rather quickly:
This command will copy the entire contents of the CD-ROM into memory. If this doesn't run you out, you have a lot of memory, but we can still run you out...
In this example, we have written a small program that runs in the bash command interpreter. It copies the CD-ROM to RAM 1000 times under different directory names. That would come to almost 200 gigabytes of storage. If this doesn't do it, increase the number to 1000000 or so. Eventually, you run out.
| For details on how these commands work, try using the manual via the system web browser. |
Under White Glove, it is almost always safe to power off the computer and power it back on, however, because it stores everything in RAM, when you do this, the computer will lose everything you did so far. You can store contents on disks if you like, but for now, we will simple press the reset button on the computer, or use the power switch to turn it off and back on again.
In this section we have gone through a wide range of different operation dealing with files and directories and programs that access them. We have described how to get more details on the operations of those programs using the help system, and have started to explore issues related to copying, moving, renaming, deleting, and otherwise using files and directories. We have described where many of the standard system files are stored and what they are used for, and we have shown you what happens when you run out of space.