 Linux Networking |
| Linux Networking |
Linux is the name of the most popular version of the Unix operating system in use today. It gained its popularity because it is free and because the source programs used to create it are free. This makes it easier to program than other closed source versions of Unix. It is built upon the work of many other people, all of whom have built and provided free software for many years.
The CD provided for this course contains a special version of Linux called "White Glove". It is not free, but it builds on a lot of free software. We use the White Glove for this class because it has been customized for the class needs and because it is simple, easy to use, and doesn't require installation or other special effort to get it going. There are many other versions of Linux that are available in the market, and each has its quirks and features, but most of the things taught in this course will work on all versions of Linux and most versions of Unix.
| White Glove is a cut down version of Linux similar to other Linux versions. Most of the commands are the same, but some are simplified or special versions for White Glove. This allows the entire operating environment to run from a single CD-ROM which - in most versions - can fit in a shirt pocket. |
On most computers, if you place the White Glove CD in your CD-ROM drive, it will pop up a browser window that shows you the White Glove on-CD manual pages. This allows you to read about how to use the White Glove CD and many of the applications on it. You should do this first and review the White Glove "HelpCard". In particular, you will have to login and type 'startx' after you reboot the computer in order to get things going in a graphical user interface.
After reviewing the helpcard, it is time to reboot the computer. In most cases, the normal computer shutdown procedure should be used. Once the computer is shut down, turn the power back on. If the computer is configured to boot from the CD-ROM, after a lot of typing, you will get prompted to login. Type:
wg login: root
This identifies you as a user named 'root' to the system. On bootup the 'root' account has no password and has unlimited access to the computer. We will fix this problem soon, however for now, we will leave it as it is.
The prompt you see when you login indicates the name of the computer (wg), the user name you are logged in under (root) and the directory you are in (/root). The '>' prompt indicates that the computer is ready for you to type a command. For this class, we will start by bringing up the graphical user interface called 'X11'. Type:
wg:root /root> startx
If everything went well, the computer took a few seconds and produced a graphical user interface. If not, additional work is required to get the graphics system working properly. In this course we will assume that X11 worked and that the mouse moves about the screen, however, if this failed, you will want to turn off the computer, then restart the computer removing the CD-ROM from the CD-ROM drive at startup so your other operating system runs, and then review the help card for advice on how to get the graphical interface working on your computer.
The X11 interface looks something like this on startup:

At the bottom of the screen there is a small control bar. It displays which 'workspace' you are in, allows you to change workplaces, shows the current working directory of the current application (there is none at startup), and displays the time of day according to the system clock. In the top left hand corner is an 'xterm' window. This is a window that lets you type commands just like the command window we used to start up X11. The rest of the screen is what we call the 'open area'. It doesn't have any windows covering it.
The first thing to learn about using X11 is how the mouse works. As you move the mouse into and out of different areas of the screen, the windows under the mouse become 'active'. By this we mean that when the mouse is over a window, the button clicks and mouse movements apply to that window. In the defaults interface, you don't have to click anything to get into a window, just move the mouse over it. We can change this - later. For now, move the mouse over the xterm window. In case you didn't notice, when you entered the window, the bar on the bottom of the page changed to include the current working directory of this window. Now type:
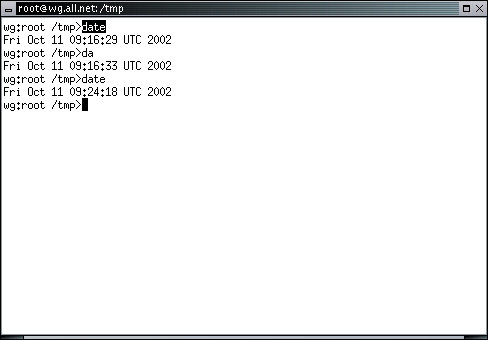
wg:root /root> date
This should display the date and time the computer is currently set to. The 'date' command can also be abbreviated as 'da'. Try this as well.
Most mice we use have 3 buttons, referred to as the 'left', 'middle', and 'right' mouse buttons. The buttons are used for different things in different windows and for still different things in the open area of the screen. In most applications, text can be 'marked' by using the left mouse button. For example, if you move the mouse to the left end of the 'd' in the word 'date' which you typed earlier, press and hold down the left mouse button, and move the mouse to the end of the 'e' in 'date', the word 'date' will be marked. Release the mouse and the word stays marked. Now, press and release the middle mouse button (or if you don't have one, hold the [shift] key and press the [insert] key for the same effect). This will insert the marked text as a command. Now press [enter] and the command will be run. You can pick any parts of the text from the X11 screen this way and mark then paste them as you desire. This is very handy because with very little effort and without using the keyboard at all, you can copy and paste.
By now, your xterm window should look something like this:
In X11, you can 'shade' a window by double-clicking on the area in the middle of the top of the window with your left mouse button. A double click is two presses and releases, one right after the other, in rapid succession. Try double clicking to shade the window. Then, double click again to unshade the window. This is very handy when you have a lot of windows and you don't want to see them all.
If you want to move the window around, place the mouse over the same area at the top of the window, press and hold the left mouse button, and move the window around. Release the button to leave it where it is. As you move the window around, you will see only a frame outline and not the whole window, and you will see the x,y coordinates of the upper left hand corner of the window displayed in the center of the screen. This can be handy if you ever want to put a window in a specific place for some reason or another.
You can also reshape the window. This is done by pressing and holding the left mouse button over the darkened area at the bottom left or bottom right of the window. When you are over that area of the window, the mouse cursor will change to look like a corner. This tells you you are in the right place. Resize your window and when you are done, release the button to let the window remain that shape.
If you want to make a window cover the whole screen, press the box just to the left of the 'X' near the upper right hand corner of the window. After you try that, you can return it to its previous shape by pressing the same area again. Finally, kill the window by pressing the 'X' in the upper right hand corner, leaving a blank screen.
Now that only open area is left on the screen, let's open up a new xterm. This is done when your mouse is over an open area by pressing and releasing the right mouse button, moving the mouse over the line that says xterm and pressing and releasing the right mouse button. Remember, left to bring up the menu, right to select it. A new xterm window should appear in the upper left hand corner of the screen, and you can move into it if you want to type more commands.
Sometimes, a program that is in charge of a window fails in such a way that a window becomes unresponsive. In this case, you need to kill the window more forcefully. This is done by selecting Kill X Window from the menu in the open area of the screen. Once you select it, a different icon will appear. Move the mouse over the window you want to kill (in this case the xterm window you just created) and press the left mouse button. The window should disappear and the program that was controlling that window should be terminated. This almost always works, but be careful... if you kill a window you wanted to have working, you will have to start it up again. If you change your mind after the xkill icon is displayed, just left click over an open area of the screen and the xkill will have no effect.
To exit X11, select Exit from the X11 menu. Let's do that right now.
After you exit, you will get a prompt just like the one you got right after you logged in. To reenter X11, you could type the same thing you typed last time (startx) but there is a short cut. You can use the [up-arrow] key on most computers to go to the last (or earlier) command(s). Press [up-arrow] once to get the 'startx' command on the command line, and press [enter] to invoke the command.
wg:root /root> startx
Before we go on to details of how Linux operates and what's 'under the hood', we will go though many of the built-in menus that do most of the most common applications users of the White Glove distribution want to do most of the time.
The first thing many people want to do is get a web browser working on the Internet. This is done by selecting User Functions and under there, Network Setup. This will bring up a new xterm window and automatically run the network configuration program in that window.
If you are running on a Dynamic Host Control Protocol (DHCP) or Boot Protocol (BOOTP) network (most cable and DSL providers do), select the interface (usually eth0), press the DHCP button. Within a few seconds the window will update and you will be configured for networking.
If you are running manual IP configuration, select the interface (usually eth0), fill in the IP address, and if you want to go to the Internet and not just your local network, fill in the Gateway address. If you want to specify a nameserver other than those provided by default, fill in the NS entry. If you don't have the default netmask and broadcast for your IP address, fill these in as well. When you are done, press Manual and you will be configured for networking.
To confirm the network status, press the Status button:
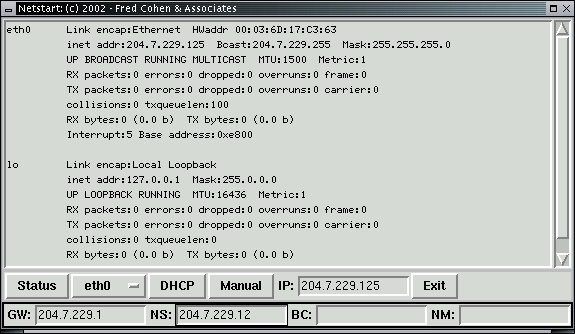
In this case, the 'eth0' Ethernet card is configured to IP address 204.7.229.125, with broadcast and netmask entries defaulted. The gateway machine is 204.7.229.1 and the primary nameserver will be 204.7.229.12. The second entry shown is called 'lo'. This is the 'loopback' interface that allows you computer to network with itself. It is very handy for testing things out when no network is present, when network problems arise, or when you have a network application but you want it to run on the local computer as a stand alone system. For more details of Linux networking, there is a follow-on to this course on building and operating Linux Networks.
One of the nicest things about the Internet is that it is an excellent timepiece. Using a protocol called Network Time Protocol, you can get the time within less than a second. In White Glove, this is done by selecting set time from the User Functions X11 menu. The window looks like this:
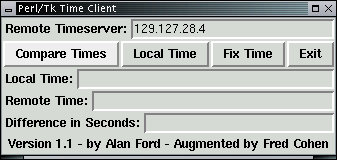
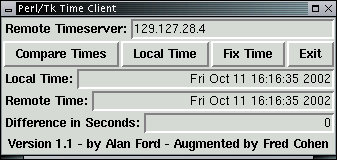
To see your local time, press Local Time with the left mouse button. Then, choose Compare Times to see how your local time compares to the Internet's global clock. Finally, select Fix Time to set your local time to the Internet's time and run a background program (called a daemon) to keep your time set to Internet time. Note that the Internet time is for the Greenwich Mean Time time zone, so in California it is about 11 hours from local time. Here is what you get when you do Fix Time followed by Compare Times:
To run the built-in graphical web browser, select Web Browser under web, mail, news, chat from the User Functions menu. This starts up the 'Mozilla' web browser and points it to the online White Glove manual page:
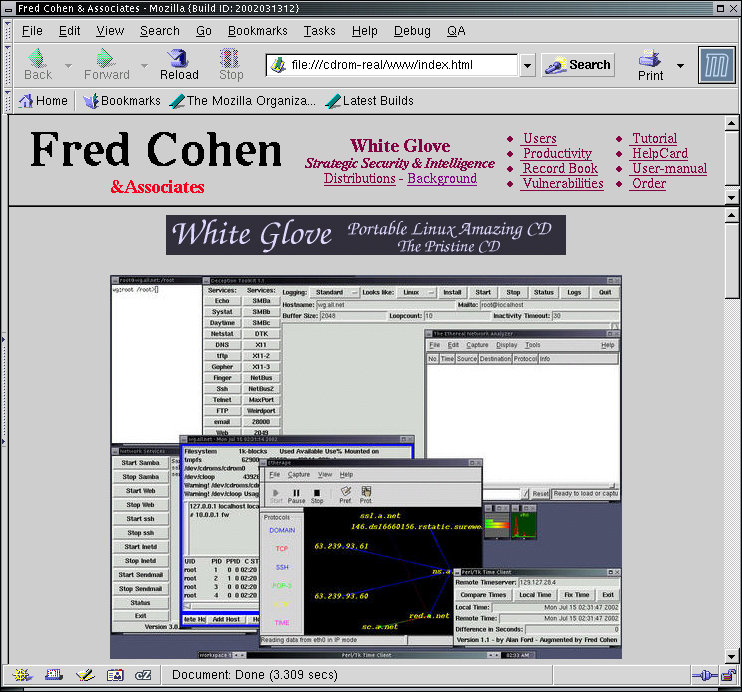
This page uses only files on the local computer and works even if the Internet is not working. It allows the user to access the help card, user manual pages, tutorial, and other related on-CD files that describe most of how the White Glove CD works. Most of the information about applications is included in this part of the CD, however, there are many valuable resources for Linux on the Internet and, assuming the network is now working, we will try to use some of them.
The following Internet sites should be briefly viewed by all class members:
www.linux.org: This site has a lot of news items as well as documentation, detailed assistance on using specific Linux features, information on courses, books, news, hardware, vendors, and on and on. Particular attention should be paid to the "Documentation" and "Applications" areas. The HowTo areas give step-by-step instructions on how to do complex configurations under some versions of Linux and are critical to systems and network administration of Linux systems. The applications review thousands of different programs in a wide range of areas of interest. Many of these applications are freely available for download over the Internet.
www.ibiblio.org/mdw/index.html: The Linux Documentation Project provides detailed documentation on Linux operations and administration.
software.linux.com: lists hundreds of software packages that run under Linux, most of them downloadable directly.
Linux Source Navigator: IF you are looking for or working with Linux operating system source programs, this is the place to go for details.
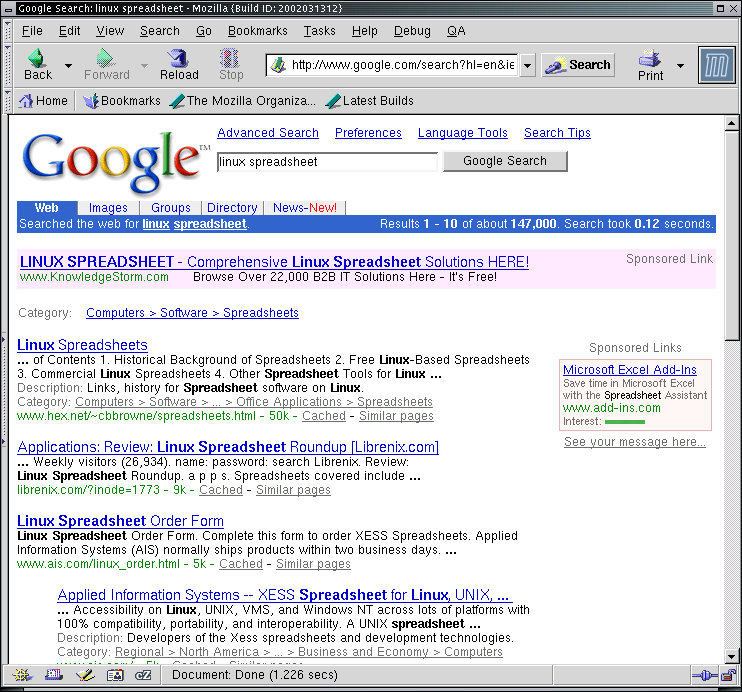
There are many other sources of Linux-related information. The most helpful thing we have found is to go to www.google.com and search for "Linux" followed by whatever you are looking for. For example, I entered "Linux spreadsheet" and got a wide range of different Linux-based spreadsheet listings and reviews.
There are several other applications in the same menu as the one for web browsing. Feel free to try them out in the same way as you used the web browser. You can also try downloading an application or two from the Internet and getting it to run under the White Glove, but this tends to take a bit if time and during the class we simply don't have the spare time to do it.
A visual editor can be started by clicking on Editor from the Office Stuff selection in the User Functions X11 menu. This editor allows you to edit text files and many non-text files as if they were text files. It is particularly handy for changing configuration files, writing small programs, and similar tasks.
There are many other many selections in the menus, including those for systems administrators and network analysts, and so forth. In other courses, other tools are explored in more depth, however, in this course, we will be focusing on some of the tools in the Administrator menus which help us to understand what is going on in the system and view into what it does and how it works.
In this part of the course we have gone through the basics of starting up Linux from a CD, starting the X11 user interface, using the graphical interface, typing simple commands, getting on the Internet, and running some of the standard applications that are commonly used by users.