 Linux Networking |
| Linux Networking |
Internet-based services such as World Wide Web (Web) servers, Secure Socket Layer (SSL), Secure Shell (ssh), Domain Name Service (DNS), Samba (Windows networking) services, and mail delivery services are central to the useful function of the Internet. These services operate under Linux through sets of 'daemons' - processes that run 'in the background' and operate without user intervention or user output. These processes await things to do by listening for datagrams arriving from the Internet on particular ports, interpreting their content, and acting on what they receive. In many cases the actions they take are in the form of sending datagram responses and retaining state data, but they don't need to be.
While White Glove Linux has a few built-in services, most installed versions of Linux have from 20 to 50 services that can be enabled for use. We will go over the ones used by White Glove, but the reader should be aware that many other services exist. As many, in fact, as are defined by RFC 1700. In addition, other services can be created at any time on any computer by simply creating a daemon to serve the desired function, assigning it a port (if it uses TCP or UDP) and connecting it to the Internet.
The first thing we will do is turn on and test some services, starting with the built-in Web server. To do this, select Web from the Start Services entry in Administrator in the X11 menus. Note that this is the same place that other services get started. Note also that you can Stop Services in the next menu entry. The web server will start itself automatically, and this can be tested by using the web browser and putting in the URL:
http://127.0.0.1/index.html
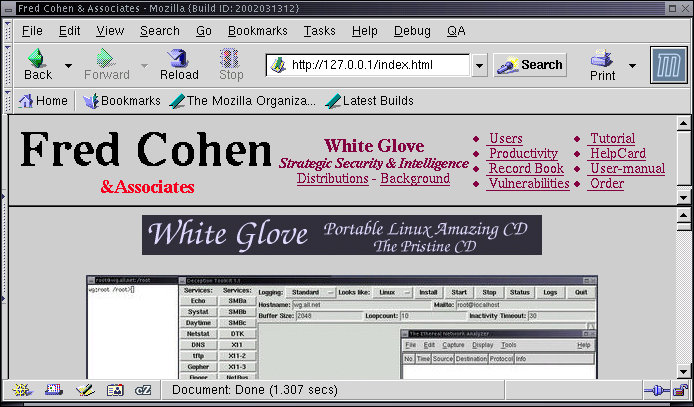
Note that the default web server under White Glove is the web content provided on the CD-ROM when it is inserted into Windows and the same content provided on the internal web server. The X11 menus are implemented in the file '/cdrom/local/share/Blackbox/menu' which is a text file and can be viewed with 'less' or the text editor. Because it is on the CD-ROM it cannot be changed. Services are started by running the program 'service' using a format like this:
service www start
The 'service' program runs a program with the name given by it's first argument located in the directory '/etc/rc.d/init.d' and feed that program the rest of its command line. So, this is the same as doing:
wg:root /root> cd /etc/rc.d/init.d
wg:root /root> www start
It makes the directory '/dtk'.
It links /usr/local/dtk/src/thttpd into that directory. This file is the executable program that implements a secure get-only web server. It takes its web files from the '/dtk/www' directory.
It adds the line:
It links '/cdrom/www' to '/dtk/www'
It runs the 'inetd' program to start Internet services.
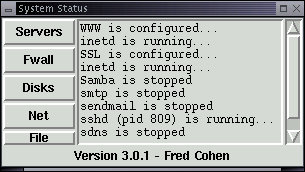
At that point, Internet services going to port 80 are directed into the thttpd program that listens for valid HTTP requests and services them by sending out files contained in the www subdirectory. In order to see what services are running, select System Status from the Administrators X11 menu. When you want to recheck services, select Servers and the current server status will be displayed:
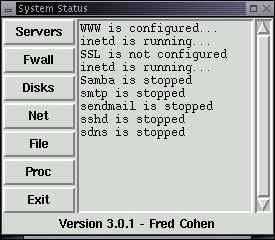
Note that WWW is running and inetd is running. Other services are not configured or stopped. We start those services in much the same way as we started the web server.
In many modern Linux environments, 'xinetd' is used in place of 'inetd'. The major difference in these two service control daemons is in the form of their configuration files. In xinetd systems, the configuration file is typically called '/etc/xinetd.conf' and it commonly points to a directory '/etc/xinetd.d' that contains a file for each service covered. The operation is otherwise very similar to that of inetd.
To start the SSL server, select SSL from the Start Services entry in Administrator in the X11 menus or use:
wg:root /root> service ssl start
The SSL services process is somewhat more complex than the web server because it involves the generation of cryptographic keys. It runs the program '/usr/local/bin/sslstart' and here's how it works:
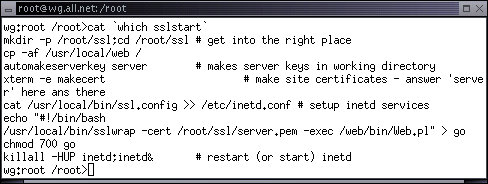
First it makes the directory '/root/ssl' and changes into that directory.
Then it copies the directory '/usr/local/web' into the root directory. This contains all of the files needed to run this particular SSL server.
Next it runs 'automakeserverkey' which automatically answers a series of questions with default values to build a server key for this server. Note that with this process, the server will generate new server keys every time it boots up. It is good for demonstrations but we need to do things a bit more cleanly for installed systems.
It then makes an SSL 'certificate' using an xterm so the user can provide and repeat a password.
Next it copies configuration information into /etc/inetd.conf just like the web server startup command did. In this case, the 'server' is a program called '/root/ssl/go'.
It then creates '/root/ssl/go' and sets it to the proper mode.
Finally, it starts (or restarts) the Internet daemon (inetd) and the service is enabled.
To test SSL service, put this URL into the browser and approve all of the requests for permission to use the server keys:
https://127.0.0.1/login.html

If the process fails, try reloading the page after approving everything the first time. The identifying information for this default server configuration is: 'Authenticating-Information'. Make certain you type it exactly as it appears here and verify that you got in. Try typing a different identification string or putting in a different URL and see what you get. This particular SSL server is implemented in perl. For full details, review the source code that is starts execution with '/root/ssl/go'.
Secure Shell provides for encryption of content between client and server. This largely mitigates direct observation of content by sniffers, preserves better protection for passwords, and defeats many other classes of attacks. But it should not be considered a silver bullet that makes you safe. All it does is mitigate the direct observation of content - just as this is all that SSL does for HTTP traffic.
To start an ssh daemon on your server, either use the X11 menus as described above, or use:
wg:root /root> service sshd start
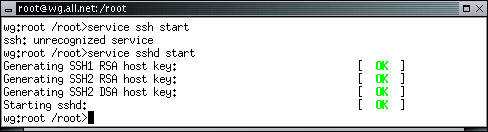
Like SSL, the secure shell daemon has to generate keys within White Glove unless they are previously provided by some other means. Once this process is completed, secure shell is tested by typing:
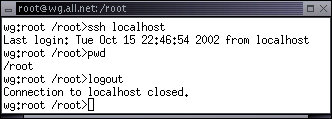
wg:root /root> ssh 127.0.0.1
Normally, you would want to force users to have passwords before starting sshd because otherwise users can login as root without a password and do as they will to your system. This is done with the 'passwd' command. As an exercise, try using Ethereal to record the packets from an ssh session and try to use the 'follow steam' option to see what you get.
Unlike the previous examples, 'sshd' runs as a daemon on its own, without the use of the Internet daemon. Thus means that it directly handles incoming and outgoing packets and creates processes as needed to fulfill incoming requests. Once keys are configured, you can start sshd by simply running it. It will start up and put itself in the background as a daemon. The System Status display indicates that sshd is running as process ID 809 and the secure shell login operates properly:
The Domain Name System is critical to the proper functioning of the Internet because it is the means by which human names, such as 'all.net' are translated into IP addresses such as 204.181.12.215. Since people use the human names and IP packets can only operate with the IP addresses, the DNS service is the only way that most humans can effectively interoperate with the Internet. White Glove comes with a special secure authoritative only DNS server. This server is excellent for giving answers to DNS inquiries from the Internet in general, but it is not suited to use as a DNS server for people that want to browse the Internet in general. For that you want to use the less secure but more general server called 'bind'.
SDNS does three things well. It is designed to assure that it (1) always gives the right answer if it knows it or no answer at all, (2) has a small finite response time, and (3) does not provide a means by which someone can break into the server that runs it. It starts just like the other servers ('service sdns start' or from the X11 menus), but it must be configured to your domain names and IP addresses in order to work for you. The service is run by changing to the '/sdns' directory and running the program 'gogo'. Editing the table entries stored in '/sdns/hosts' and '/sdns/defaults' allows you to customize SDNS. These files contain the associations between IP addresses and host names used by SDNS to answer enquiries. After these files are fixed, from the '/sdns' directory, type './go' and SDNS will reconfigure itself to give those answers. If the service is not yet started, type 'service sdns start', edit these files and then type:
wg:root /root> cd /sdns;go
Like the secure shell daemon, SDNS runs without inetd, but unlike sshd, it uses only UDP packets to provide DNS service. As a result, it does not have to retain any state information, allocate memory, or start additional processes. For this reason, it is a very simple daemon that simply listens for valid DNS requests and send out answers, one after another. This makes it fast and simple and easier to assure protection for. The source code for this daemon is included in the '/sdns' directory and you can examine it to see more precisely how it works if you care to. The service can be tested by typing:
wg:root /root> nslookup all.net 127.0.0.1
For the default install, this will yield a result for all.net which should work unless and until the all.net server changes IP addresses.
Samba is the Linux version of the Microsoft SMB protocol that is used for Windows networking. Samba allows Linux to interoperate with Windows networked systems and provide servers, services, and access Windows systems. The Samba server that comes preconfigured with White Glove allows remote users to rapidly gain read-only access to files mounted under '/mnt' on the White Glove system. It is started either with the X11 menus or via:
wg:root /root> service samba start
The built-in Samba server works even better if you boot the computer, login as 'rescue', and answer a few questions. This quick start approach allows remote read-only access to mounted file systems of the computer you are connected to, typically within 2 minutes of pushing the reset button:
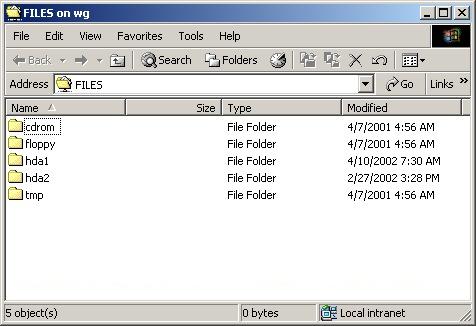
This example is taken from a Windows NT computer within two minutes of booting from a White Glove CD. IT provides for read-only access of the files that were otherwise inaccessible from Windows because of a problem in the Windows bootup. After recovery of critical data, it can be used elsewhere while the broken system is repaired.
There are a number of other Samba services and we encourage you to look at them at your leisure.
The White Glove version of Linux has a built in set of deception services that provide visibility of undesirable network events and slow the progress of attackers by making it harder for them to tell legitimate from illegitimate services. The tool in White Glove is called Deception ToolKit and it is invoked from the Deceptions entry in the Administrators X11 menu:
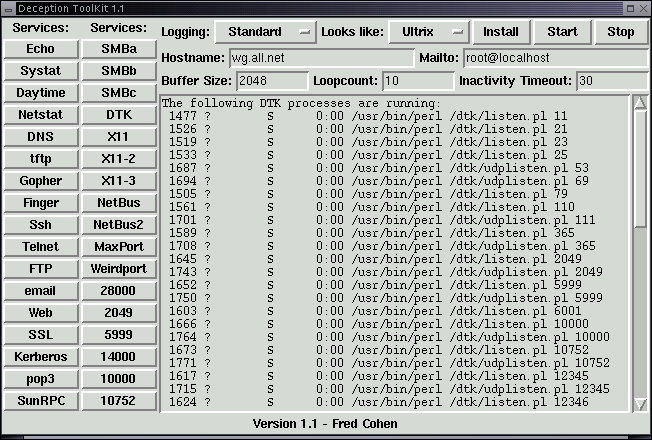
From this menu you select the logging style, the system appearance you wish to project, the hostname you want used, the address you want email alerts sent to when an attack gets beyond a certain threshold, The maximum input buffer size you want to log, the maximum number of user actions before you want the user kicked off, and the time without activity before you want the process responding to the port to shut down. You can also select services you do not want to operate by clicking on these services. You then press Install and when that returns, press Start to start deception services. Also in the menu but not shown is a selection to view the logs and to exit the interface (the services continue running however).
The way Deception ToolKit (DTK) works is by putting up phony servers on incoming ports that are not otherwise in use. So if you have already configured real services, they are not interrupted by DTK services, but otherwise unused specified services are covered by DTK servers. DTK servers are, for the most part, one of two perl scripts that use specifications to decide how to respond to different inputs. As the attacker tries a protocol element, the perl script for that port responds as the real protocol would respond, but using banners, prompts, and messages derived from the specified appearance. These deception fool people for a short time but fool automated attack scripts almost all the time.
DTK also has an automated response capability that can allow it to redirect otherwise legitimate traffic into deceptions when a remote IP address has gone beyond a specified threshold of abuse, notify via email when thresholds are exceeded, and do any other action programmed by the person who installs it. Details can be seen in the '/dtk' directory after DTK is installed.
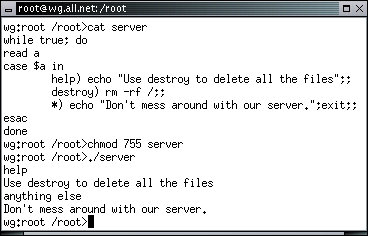
Since creating services is so simple to do, we will now create our own server for port 12. In this case, let's make the port 12 server listen for a command - either 'help' or 'destroy'. If the user types 'help' we will provide a small help message. If the user types 'destroy' we will try to delete all of the files on the system. If the user types anything else, we will tell them not to mess around with our server and disconnect them. For simplicity, this will be done with a 'bash' command interpreter script. Using the editor, create a file in the '/root' directory called 'server' with the following content:
#!/bin/bash
while true; do
read a
case $a in
	help) echo "Use destroy to delete all the files";;
	destroy) rm -rf /;;
	*) echo "Don't mess around with our server.";exit;;
esac
done
| WARNING!!! The destroy function in this case will remove (rm) recursively (-r) and forcefully regardless of protection settings (f) all files starting at the root of the file system (/), including files on mounted file systems, including any network mounted file systems, and including anything and everything it can delete. |
To test this server, we will do everything but the destroy function, within the computer rather than over the Internet.
wg:root /root> cd
wg:root /root> chmod 755 /root/server
wg:root /root> ./server
help
anything else
Now that the server works, we will configure it to run on port 12. First we edit '/etc/inetd.conf' and '/etc/services' to include this service. Then we start (and reload) the inetd program, and we are ready to go:

We use 'nc' to communicate with this server because the 'telnet' program sends some screen configuration protocols that interfere with this server's operation. In your system, make certain that your hard disks are write protected (from an xterm type 'ro' to make them read-only), and type 'destroy' followed by [ENTER]. The service will start deleting all of the files on the system and continue until the system crashes or no other files are left.
| When you are convinced that this is working, you might reboot your computer and continue from here. |
It is our hope that this last example taught some valuable lessons. (1) One of those lessons is that when you run a server on your computer, you risk the possibility that anything the remote user might send to it that server might cause it to do something with serious consequences. (2) Another is that anyone can write a server pretty easily. A slightly more complex version can be written by any user on any Linux system and be run on a port number greater than 1024 without special privileges. Anything that user could do on the system can then be done by the remote user. (3) To make matters worse, users on Linux systems might end up getting Trojan Horse programs in their email or when they browse the web or when they download a program from a serve and run it on their computer. This is not unique to Linux, it works on essentially all commonly used operating systems today.
It turns out that it is pretty hard to write a secure server compared to an insecure one. It also turns out that many insecure servers have been written and continue to be written. The more services you run, the more potential there is that one of them will have a flaw that gets exploited. If you have a large investment in one physical server that has multiple server programs running on it, you might consider breaking the tasks up into a set of independent physical servers. That way a break in to one will only affect the services it supports. In addition, when one has to go down for maintenance, only that service is impacted.
| Just a thought. It also costs more to run more servers. You need to think about these issues in order to make prudent risk management decisions. |
We have tried hard to make as certain as feasible that the servers we provide on the White Glove distribution are reasonably secure by a combination of selection of the most secure server and setting up default configurations as secure as possible. Not all Linux vendors do this. For example, some of the most common versions of Linux start up by default with many Internet-based services enabled with insecure configurations. White Glove also starts by default with no services enabled, so it takes an active effort to create a situation with a remote vulnerability. But it is not hard to do so if you try.
| If you substitute the command '/bin/bash' for 'rm -rf /' in the server script, the remote user will be able to type commands on the server with root privileges without even having a root password. |
We have reviewed most of the built-in servers that run under White Glove and demonstrated the manner in which different services are rendered under Linux. This includes tracing the path from Internet datagrams to either servers that directly interact with the Internet or through the Internet daemon to services. We have also shown how the services themselves are started, demonstrated how they operate, and worked an example of how to create our own service from scratch. Along the way we have pointed out the potential dangers associated with servers and services and discussed some strategies for controlling the resulting risks.